Friday, 20 December 2013

Exciting news for me.....

I am now part of the Design Team over on the Crafting Cafe blog. 
I am really looking forward to working with all the design team and getting to share my makes with you.

Here is the project that I created for my first DT Project. Using Sketch no 1 (on the Crafting Cafe Blog) as a template I created a background using two holly stamps and coloured them with Promarkers. I used Wink of Stella markers to add a glitter effect to the leaves and berries. I mounted the panel on to black card to make it really stand out.


It would be great if you would join in with our challenge - you will find it over here

I would also like to take this chance to wish you all a very Merry Christmas and Happy New Year!

Other challenges I am entering:

2 Creative Chicks - Christmas / Winter
Cards Galore - Christmas
Feeling Crafty - Christmas


Thursday, 12 December 2013

Let It Snow


Here's hoping we will see some snow in the South of England this year! With Christmas fast approaching and more presents to wrap than Santa I decided to keep things CAS.

I made this card using a stamp set which came with one of the stamping magazines. I used two different colours of Distress ink - Chipped Sapphire and Salty Ocean.

And that is it!


Challenges I am entering :
Addicted to CAS - Snowflakes
Fab n Funky - Snowflakes


Monday, 2 December 2013

All is calm, All is White

Its very rare that I use white on white in my projects, but I am pleased with the result. The inspiration started at The Funkie Junkie 12 Tags of Christmas Challenge. I am so hoping that I can finish this challenge, but as the big day gets nearer the days get busier!


I took inspiration from Linda's tag in the form or the three small tags, the snowflakes and flowers. 
First I embossed the background with a snowflake embossing folder and my Sizzix machine. Then I applied Perfect Medium and WOW! Embossing Powder  - Hologram Sparkle. The tags were cut with a die and the snowflakes punched from silver mirri card. The letters are Thickers which I have had in my stash for some time! I mounted the tags onto the background with foam pads. The flower embellishment was made from the same embossed card stock and vellum, cut with the Tattered Floral Die. I finished the card off by mounting it onto grey card and then Silver Centura Pearl.  So now its onto stage 8 of the challenge!

I am also entering these challenges:
Crafts Galore  - Christmas
Glitter 'n' Sparkle - Add some Glitter and Sparkle
Crafty Hands - Sparkle and Bling
Simply Create Too - Snow or white only


Saturday, 30 November 2013

A little Deer

So we bought our Christmas trees home today and our outside lights will be switched on tomorrow! Christmas is definetly on its way!

So I thought I'd share a really sweet Christmas card with you. One of my favourite stamp companies is Little Claire. This little deer was new this year so I had to buy it!


I stamped the image and coloured it with Promarkers. The wreath I made using a Marianne Designs die and red gems for the berries. I added a ribbon and a greeting to finish. I don't think I can bear to part with this one!!

Challenges I am entering:

4 Crafty Chicks - Christmas
Crafting By Design - Christmas / Winter


Tuesday, 26 November 2013

Autumn Trees

With Winter fast approaching I suppose it's a good thing I got this card finished! I am always inspired by the artwork on the blog challenge Craft a Scene, but have never entered. This time the theme was Trees and I decided to enter this card.


I started off by colouring the background Centura Pearl Card with a variety of Distress Inks. Then I overstamped using three shades of the Distress Inks the trees, using Crafty Individuals Stamp CI-209. I then spattered Cosmic Shimmer mica spray over the centre of the picture.  I drew in the fence freehand. I made a stencil to create the sun and overstamped the trees in the foreground using Brushed Corduroy Ink. Finally I added the sentiment again from the same stamp set and mounted the piece onto a kraft card blank.

I am also entering this into the following challenges:
LadyBug Crafts - Autumn Colours
So Artful - Trees


Monday, 25 November 2013

A Busy Monday!

Last week was a bit of a washout craft wise with my son being at home sick, so I didn't get much time to craft. But I made up for it this morning!

My first post is for Linda's Funkie Junkie's Tag Challenge - week 6 (yes still catching up!!).


I made a jumbo tag and covered it with two styles of Kaisercraft paper. I distressed the papers with Frayed Burlap ink. The trees, numbers and birds were made using my Cricut machine. I stamped christmas words onto the tree and then covered it with Rock Candy stickles. I used a vintage postcard I had in my stash on the top and distressed all the other diecuts with Distress Ink. Finally I made the bows and added a snowflake brad. 

Don't forget the prize is a voucher from The Funkie Junkie's store!

I will be back again tomorrow with more makes!!

Sunday, 17 November 2013

Funkie Junkie 12 Tags of Christmas Challenge - Week 5

Its certainly beginning to feel colder now and heading fast towards December. And I'm still a bit behind with my Funkie Junkie 12 Tags of Christmas Challenge entries.

For this one I decided to stick with the vintage look.


I created the background by stamping a holly garland across the page in Walnut Stain. I stamped the Father Christmas (Artistic Stamper I think) on white card using Walnut Stain and Frayed Burlap Distress Inks. I then diecut the frame from kraft card using Spellbinders die and embossed both the mat and the frame using a wood texture folder. I aged the pieces with Frayed Burlap and Barn Door inks. The lace was added and the poinsettia has again been aged with Distress Inks. I added glitter glue to the stamped holly background and flower centre.

Why not join in with this fun challenge - all you have to do is make something inspired by each of the 12 tags and you could be in with a chance of winning $50 to spend at the Funkie Junkie Boutique


Wednesday, 6 November 2013

Funkie Junkie - 12 tags of Christmas Week 4

Now that half term is over I hope to have a bit more time to craft, but this week has been taken up with hospital and doctors appointments!

I think my camera may also need the doctor :) as it seems to be taking very blurred pictures, so I apologise if this one isn't perfect.


This is my fourth entry for the Funkie Junkie's 12 Tags of Christmas Challenge (I am catching up slowly!) I interpreted the inspiration into a card. I used a very old stamp from my stash and coloured it with Promarkers and Liquid Pearls. The backing paper is in a vintage style from Kaisercraft. I created the embellishment using some hessian, ribbon and poinsettia diecuts covered with text paper.

Other challenges I am entering:


Thursday, 31 October 2013

Happy Halloween!

It's here! The spookiest night of the year! We are all set here at our house!


Time has been a bit short this week with it being half term, so I made a quick card with a fabulous stamp set I won from Flonz Crafts via The Fashionable Stamping Challenge.


I used Distress Ink and a stencil to create the moon. Then I stamped and embossed the image using Ebony Black WOW! Embossing Powder. I added ink around the edges and mounted it onto black card.

There are lots of Halloween Challenges around this week so I am entering this into the following :

Happy Campers - Halloween
Fan Tastic Tuesday - Square Halloween
Fab N Funky - Halloween

Saturday, 26 October 2013

Funkie Junkie 12 Tags of Christmas - Week 3 Catch Up

Sometimes it's great when a plan DOESN'T come together! Which is exactly what happened when creating this project.  It started out as a card, but the gold leaf went on slightly wrong, so I ended up cutting the card in half to make this tag and I'm quite pleased with the result.


I am slowly catching up with The Funkie Junkie's 12 tags of Christmas Challenge. As Linda did I coated the card with Frayed Burlap and dusted it with gold perfect pearls. I stencilled the stars with the Frayed Burlap. and added the Sunset gilding flakes along the bottom. The black silhouettes are peel offs I found in my stash (amazing what hides in the stash!). I didn't have the same font for the Noel so I used a wooden embellishment covered with WOW Brass Sparkle Embossing Powder. The brass stars are brads  - again in my crafty stash!

Onto Week 4!

Wednesday, 23 October 2013

Getting Ready for some Spooky Fun!

With Halloween just around the corner, my son and I have been doing some spooky crafting. Tonight we have painted a china pumpkin, a bat and made some pipe cleaner spiders!

And back in the craft room, I have been making a Halloween Card.


I had great fun creating the background - first using Distress Ink in Stormy Sky, Black Soot and Dusty Concord on Centura Pearl Card (the uncoated side). I used a mask to create the tree silhouettes in the background. I then stamped and embossed the two trees and the gate is just the top of a Paper Artsy full size stamp. The bat I stamped in Distress Ink too. Finally I made a banner which reads Happy Halloween!

I am going to enter the following challenges with this card:

Try It On Tuesday - Halloween
Make My Monday - Halloween


Monday, 21 October 2013

Funkie Junkie Challenge - Catch Up Week 2

I am slowly catching up with the challenge Linda at Funkie Junkie has set this year.  This is my take on her Week 2 inspiration.


I'm not too keen on the reindeer I used, but I had to improvise! I created the background by swiping the tag through Frayed Burlap, Picket Fence Distress Stain and Perfect Pearls (as Linda did). Then I stamped the trees and the sentiments. The reindeer I created by die cutting and then embossing with gold powder before stamping into it while hot. The stars are wooden, stained with Picket Fence, stamped on and then covered with Glossy Accents and glitter. 

Week 3's tag to follow soon!

Other challenges I am entering : 

Thursday, 17 October 2013

A Cup of Cheer

I don't know why but I seem to be into all things festive this week! Far too early!  I treated myself to another of Sheena Douglass' stamp sets and love the result I achieved.


The mug was a bargain purchase from The Range! I simply stamped the image and coloured with Promarkers. I added snow effect frosting to the cup. The backing paper is a folksy design from Docrafts and I added the ribbon and a sentiment.

I have also added this card to my Etsy store - but don't really want to part with it!

I am entering this into the following challenges:

Simon Says Stamp - Christmas / Winter
Crafty Musketeers - Christmas in October
Crafting Cafe - Anything Goes

Monday, 14 October 2013

Boo!

Did I scare you?! With Halloween only a couple of weeks away, I thought I would get into the SPIRIT (LOL) with a spooky tag.


I made this tag initially with the challenge at Our Creative Corner in mind which is to create a Halloween tag with texture. I covered the tag in black tissue paper and then dry brushed it with silver acrylic paint. The Spiders web and spider was diecut with my Cricut machine. I then stamped and cut out the bat. The vial is filled with silver glitter and I added a vintage label. Lastly to hang the tag I created a chain from jump rings.

Look out for more spooky projects coming soon!

Challenges I am entering:
Country View Challenges - Something Spooky
Unruly Paper Arts - Going Batty


Friday, 11 October 2013

12 Tags of Christmas Challenge

I think Autumn has settled in for good today in the South, it is dull, wet and cold - perfect for staying in and crafting!

I have decided to try and join in with the Funkie Junkie challenge (sponsored by the Funkie Junkie Boutique Store) to make a Christmas tag each week based on the inspiration given. I am a bit behind, but here is my take on Week One.


To make the tag I used black card which I stamped and embossed snowflakes onto using WOW Embossing Powder. I edged the tag with a white inkpad to give it a chalky look.The baubles are from a fabulous set FREE! with Simply Cards and Papercraft Magazine this month. Again these were embossed with Bright White Embossing Powder from WOW! The holly leaves are stamped and coloured with Distress Markers and I added a felt snowflake and a pearl to finish.

1 down - 11 to go!

I am also entering this into the following challenges :
Winter Wonderland - Wrap It Up

Friday, 4 October 2013

Countdown to 40!

Well the dreaded 4-0 is nearly here for me (Sunday!) I keep trying to ignore it but it won't go away! Unfortunately celebrations are low key due to my current ill health, but have a lovely weekend planned with family all the same.

There are so many challenges based on Autumn at the moment, which I love! I made this card a few weeks ago but never got round to sharing it with you.


First I stamped the trees from a Creative Expressions set in Distress Ink. I made a mask to create the sun again with Distress Inks. I used gilding flakes and glitter glue to highlight the trees. I then rubbed around the edge of the card with distress ink and overstamped a variety of foliage. I drew in the fence with a fineliner. The embellishment was made by die cutting the leaves from metal using the Sizzix Tattered Leaves die, embossing them and then colouring with alcohol inks. 

Happy Autumn! 

Challenges I am entering :

4 Crafty Chicks - Autumn
Addicted to Stamps and More - Autumn Colours
Feeling Crafty  - Autumn

Sunday, 29 September 2013

Inspired by Sheena

Having suffering with this sore throat the last few weeks I was able to catch up on some craft tv! I was inspired by the fabulous Sheena Douglass to make this card with an Autumn theme.


I created the background by first using Distress Inks applied with Cut N Dry Foam. Then sprayed Creative Expressions sprays and Tattered Angels Sprays over the top. The leaves are from Sheena's Paint Fusion range of stamps, embossed with Brass WoW!Embossing Powder and then painted them with Mica Paint. The embellishment was made by die cutting a leave, stamping the sentiment and using Distress ink again to add colour. Backing it onto a black card makes it really pop!

I am entering it into the following challenges:
Lunagirl - Autumn
Rogue Redhead Designs - Autumn Colours
Sugar Creek Hollow - Fall is in the Air

Thursday, 26 September 2013

Merry, but not so bright!

This week has been a hard one with yet another round of antibiotics for a throat infection! Hoping now I will be on the mend.  I have been spending time indoors crafting this week and made this Christmas card today. I bought these Woodware stamps on Ebay, they are still in good condition and stamp perfectly.


I coloured in some of the image with Promarkers and a metallic pen and then added buttons. The sentiment is a rub on. I have to say I think this makes a very stylish card.

Challenges I am entering:
Christmas Stamping All Year Round - Anything
Fab n Funky - Buttons

Friday, 20 September 2013

Autumn Twinchie

It may be Autumn but we are expecting temperatures of 70F tomorrow here in the South! I think I have said before that Autumn is my favourite time of the year. I love the colours and the cooler days and evenings when you snuggle indoors with your crafting!


I made this Twinchie for Show Us Your Twinchies Challenge which is Autumn and Autumn Colours. I used Distress Inks to colour a piece of gloss card. I then stamped and embossed a Kaisercraft Toadstool stamp with Ebony WOW! Embossing Powder. I used my new bargain Distress Pens (courtesy of ebay!) and my mica paints to colour.

Have a great weekend!

Sunday, 15 September 2013

A Windy Day!

I can't believe it's two weeks since I've blogged!! What with back to school and my son turning 7 its been a busy few weeks.  I have started working on CHRISTMAS! and today with the weather being so bad in the south I have battened down the hatches and got on with some cardmaking.

This card I made a few weeks ago, but never shared.  Its one of the first I have made using Imagination Crafts stamps and Touch of Mica masks.


I stamped and embossed the image with gold embossing powder and then stamped again to be able to decoupage the image.  I coloured the image with ProMarkers. The background was created using the mask and colouring in with ProMarkers too.

Hopefully I should have some new cards to share with you this week!

I am entering this into the following challenges:

Happy Campers - Use A Stamp


Sunday, 1 September 2013

Back to Normality

Now back from my holidays and getting ready for the start of the new school term, I have a little more time to craft. I thought to ease myself back in gently I would show a simple card which I made for Christmas Stampin All Year Long Challenge  - a mini Christmas card.

I used an old favourite stamp I have had for some years which I coloured with Promarkers and a gold pen. And that really is it!


I am also entering the following challenges :

Less Is More - Use a Rubber Stamp

Sunday, 11 August 2013

The Holiday Season

It's the holiday season and whilst I will soon be enjoying a little break in the Devon countryside, I am also thinking of the Christmas holidays too!

Here is a card I made using stamps by Molly Bloom, Distress Inks, the Cricut mini and some embellishments.


I hope you are all enjoying the summer and I hope to be bringing you more crafty goodness very soon!

I am entering this into the following challenges :
Hobby House Creations - Christmas
Christmas Stampin All Year Long - Red, Green, White

Monday, 29 July 2013

Melting in the Heat

Hopefully that's not the last of the summer now as its been raining in the south for a couple of days. Last night we even had thunder.

Well I have been melting in the heat (excuse the pun!) whilst working on my entry for Craft Stamper Magazine's challenge Take It Make It.  The challenge is to use a layered embossing powder technique featured in the magazine by Birgit Koopsen on pages 30-31 of the July 2013 issue.


For my entry I used a selection of WOW Embossing Powders to create the layers. I used a mask to apply Versamark ink through to achieve the dotty effect.

I then overstamped using a black Stazon inkpad and a butterfly and roses stamps. I added colour to the stamped images with Promarkers. Finally I added a small scattering of Frantage to the bottom right hand corner. 

I wasn't sure how to finish the project off so decided on a card. To add more interest I stamped around the edge with Dusty Concorde Distress ink using the same rose stamp. I am really amazed at the effect you can achieve with this technique!


Saturday, 20 July 2013

Deep at the bottom of the Craft Box!

I hope you are all managing to stay cool in these sizzling temperatures! Last night was so hot I got up and made a card as I couldn't sleep! It was made after having a deep rummage in the bottom of the craft box and finding these stamps.


I stamped the Kanban images using Chipped Sapphire Distress Ink and then used Barn Door and Salty Ocean to accent certain areas. The compass is a second generation imprint to give it an even more distressed look. I went around the edges with Antique Linen Distress Ink to age the card. I wrapped bakers twine around the card and finished off by adding a die cut kraft tag with a stamped image. To finish I backed the card with seaside themed paper from Docrafts.

I am entering my card into the following challenges:

Chocolate, coffee and cards - life's a beach
Stampin with the Dragon - On the beach
Simon Says Stamp - By The Sea


Monday, 8 July 2013

In a Garden

My poor blog has been a bit neglected recently what with all this lovely weather I seemed to have spent more time in the garden. Which is my theme for today's post!

This is a Twinchie I have created for the Show Me Your Twinchie Challenge - where they would like to see "In an English Country Garden". I used Cut N Dry to apply Distress Inks to watercolour card and then applied various black peel offs on the top to create a scene.


And whilst on the subject of gardens I thought I would share this gorgeous photo of  our garden visitor. He appears to enjoy the sunshine and has been out tucking into cat food!


Tuesday, 18 June 2013

For Dad

Now that Father's Day has been and gone I can share my card I made for my Dad. I was inspired to make it by the Stash Raiders article in Quick Cards Magazine. It was a great way to use all the different odd fonts I have kept in my crafty stash!


I am entering this into the following challenges :
Lexi's Creations - Father's Day / Male Birthday 
Dream Valley Challenges - Father's Day / Male
Crafter's Cafe Challenge - Father of for a Male


Also had a great boost this morning. As a stall holder on The Supermums Craft Fair, my Thank You Card was pinned onto Pinterest. This morning I was so excited to see that Hobbycraft had repinned it in their own Thank You Teacher Board :)


Tuesday, 11 June 2013

Beside The Seaside

Its probably not the best place to be today on the South Coast as its raining! Is that summer gone? Anyway staying on a seaside theme I have created this card to enter this week's Docrafts Challenge.


I used a Michael Powell Beach Hut stamp for the main image, coloured in with Promarkers and decoupaged. The papers are from the new Docrafts Seaside Collection which I used to make the bunting as well. I finished off with a greeting "Wish You Were Here". I have to say I love it!

Other challenges I am entering :
Crafting Musketeers - Use a stamped image
Make It Monday - Anything Goes


Sunday, 9 June 2013

Seaside Twinchie

What a lovely warm weekend we've had in the South of England today. Have also been reading up on patchwork today and hope to make inroads into a quilt very soon. I'm not very experienced at quilting but the heart is willing!

I made another little Twinchie this week for Show Us Your Twinchies Challenge which has the theme of the seaside.


I used a combination of stamps on a background coloured with Promarkers. I added sand Flowersoft and cut out bunting to finish. I think I might make some cards for my Etsy store like this!


Friday, 7 June 2013

No Place Like Home

The Sunday Postcard Art Challenge is one I've been meaning to enter for a while now and finally have! The theme this week is No Place like home and must be no bigger than 6 x 4" in size.


I created this first by applying Distress Ink in Mustard Seed and Peeled Paint using Cut N Dry Foam. The PaperArtsy houses were stamped and embossed with WOW Black Glint Powder onto watercoloured card that had been sprayed with Glimmer Mists. The heart was created by using the Direct to Paper technique again using Distress Inks. Finally I added the text using a stamp from WOW Embossing Powder.

I am also entering this card into the following challenges :

Ali Craft - Anything Goes


Monday, 3 June 2013

Bees and Butterflies Twinchie Challenge

Finally summer seems to here on the South Coast, I managed to get some spray inking done this morning in the garden!

My offering to you today is my Twinchie for the Twinchie Challenge which is Bees or Butterflies. I used the InkyDoodles stamp set Primitive Angel 2 which is an absolute favourite of mine. I stamped the beehive and bees then coloured it all in with Promarkers.

Back soon!


Tuesday, 21 May 2013

The Black Cat

This week is flying by and next week will be half term so time is in short supply. I love CAS cards and found time to make this one for the Less Is More challenge which this week is Cats or Dogs.

To make this card I first used the direct to paper technique using Antique Linen Distress Ink. I then stamped and embossed the cat using WOW Embossing Powder Ebony Powder. I drew the border freehand with a fine pen.

As the meerkats say - Simples!


Other Challenges I am entering : 
Make It Monday - Anything Goes
Order of the Opus Gluei - Black and or cat


Friday, 17 May 2013

Twinchie Challenge

Its amazing what you can find in your stash when you look! I haven't used alcohol inks for a while so decided to use them to make this Twinchie. There is a new Twinchie Challenge which can be found here.


Using the applicator with felt I applied the inks to glossy card stock, including the gold mixative. I used a stamp from Craft Stamper Magazine to stamp an image over the top and then embossed with gold WOW Powder.


Friday, 3 May 2013

Travels to Venice

My most favourite places in the world is Italy and in particular, Venice. There are a few travel inspired challenges this week so it was a chance to use one of my favourite stamps.


To make this postcard I first embossed it using a Docrafts  / XCut folder. Then I used Walnut Stain Distress Ink to age it. I stamped the Venice image and used a water brush to draw out the colour. I stamped the place names from Crafty Individuals along the bottom. Finally I applied gilding flakes on the corners to decorate. I have to say I am rather pleased with the result! I hope you like it too

Have a great weekend!

I am entering the following challenges

Craft Room Challenge - Wish You were Here Postcard

Tuesday, 30 April 2013

Black and White

I hope you are all enjoying some sunshine. Here on the South Coast it is quite warm today. I have been enjoying sitting in the garden, sipping chamomile tea and reading the life story of Natalie Wood.

I have found time for some crafting too. I wanted to join in with the Docrafts challenge, which this week is "Black and White"


I embossed the bottom of the card with a dotty embossing folder. Then I cut a frame using my Cricut machine. The ornamental metalwork is amazing! The stamp is one of Michael Powell's stamps which I enhanced with a black artists pen. I made the flowers using a Marianne Die and the swirl was an offcut from a Cricut cut. Finally I added pearls to the flowers and a sentiment.

Other Challenges I am entering:
Craft Bloggers Network - Anything Goes

Wednesday, 17 April 2013

Art Journalling

I love the art journal style and had a bit of time to play with my own art journal this week. I am entering this into the Fashionable Stamping Challenge, where the theme is journalling!


First I painted the page with acrylic paint, then using Gel Medium stuck on the torn book pages.  I painted over the top of the whole page with a light coat of Gesso.  I used a stencil to create the sunflowers using Distress Ink and foam.

The stamps are a fabulous set by Sam Poole for Creative Expressions. I paper pieced the fairy before adding other motifs onto the page. I used Promarkers to colour some of the motifs and the words were stamped onto paper before cutting out and sticking on.

Sunday, 14 April 2013

Window on ATCS

I haven't made an ATC for a while and love the theme of windows and doors over at Fun With ATCs.


I made this one using my favourite set of stamps from Creative Expressions. I stamped the window image and cut it out before layering it over a stamped scene. I coloured the ATC using Mica paints for a midnight shimmer effect.

Have a great day crafting!

Other Challenges I am entering :
Artistic Inspirations - Anything But a Card


Thursday, 11 April 2013

Back in action

Its been a couple of weeks since I've been able to blog. I went down with a really nasty virus Easter Weekend and have only just managed to get out of bed! The Easter holidays have been a wash out for me! and have left me extremely weak and wobbly!

I did manage to catch Hels on Create and Craft with the Melt Pot and have ordered some Beeswax which I hope to be able to play with soon! I have had my melt pot for some time but its not been used to its potential.


I made this card a couple of weeks ago after trying a different technique - stamping with Aquamarkers. I used a set of stamps from Docrafts and coloured them directly with the Aquamarkers. I drew out the colour using a water brush at the end.

I am entering this card into the following challenges :
Happy Campers - Flower Power
Simon Says Stamp  - Spring Flowers
Country View Craft Challenge - Butterflies


Friday, 29 March 2013

Key to Home

I hope those of you who are at home today are enjoying th start of the Easter holidays. Its very cold here in the South but we are still looking forward to our Easter Egg Hunt on Sunday.

I enjoy using tags in my art and found time to make this tag for the Artistic Stamper Challenge.


I used some text printed paper and coloured it with Distress Inks. I printed the word HOME and again aged it with Distress Inks. The stamps are a favourite by Paper Artsy and I stamped these onto text paper and cut them out. To finish I added a key by Tim Holtz tied with twine.


Friday, 22 March 2013

The Easter Tree

Well the Easter holidays are nearly upon us, but nearly as warm as last year. It is freezing here in the South today - although no snow!


I love Little Claire Stamps and made this Easter card using their tree stamp and Easter set.  I stamped and coloured the images with Promarkers and mounted the picture onto yellow card. I added the bunting and twine to spell out Happy Easter. I think it is such a pretty card.

I am also taking part in the 30 Days of Lists Challenge and hope to share some of my journal pages with you soon!

I am entering this card into the following challenges:

Polka Doodles - Easter
Simon Says Stamp - Easter


Tuesday, 19 March 2013

Twinchie Challenge

 I love making small artworks and it is my aim to make a large artwork one day from the Twinchies I've made. I made this for the Twinchie Challenge which is Flowers.

I stamped the flower image onto text paper twice and coloured them with Distress Ink. For the top layer I used Cosmic Shimmer Embossing Powder and Stampendous Fragments, then melted them. I cut into the flower to give it a 3D look and then mounted it onto text paper. 

I'm a bit disappointed with the photo, as its looks more impressive in real life!


Wednesday, 13 March 2013

CAS Wings

I haven't had a play with products for a long time, so it was good to make something just for the sake of it!

This week at Addicted to CAS the theme is wings, so I made this card by stamping the image using two colours of Distress Ink. I then drew out the colour with a water brush and painted over areas with mica paint. The sentiment reads Live, Live, Love and was stamped in Distress Ink.


Sunday, 10 March 2013

Happy Mother's Day

I hope all the Mums out there are being made to feel very special on Mother's Day and of course thinking of the mothers that are no longer with us.

I made so many Mother's Day cards over the last few weeks, but finally got round to making a special one for my own Mum!

I love Joanna Sheen's Holly Pond Hill CD and the lovely artwork by Susan Wheeler. So I made this card using printed sheets and the additional decoupage. I finished the card with ribbon and roses.


I am entering this card into the following challenges

Joanna Sheen - Mums The Word


Sunday, 3 March 2013

For Mum!

Firstly apologies for neglecting my blog what with half term being in the middle of February the time flew by!

A few months ago I bought a mini Cricut machine which I am slowly getting to grips with. I thought I would share one of the cards I made using the machine.I used a printed card blank as the base and added paper flowers to decorate. 

I have some other Mother's Day cards to share with you later in the week!


I am entering this card into the following challenges :
Allsorts - For a Lady


Saturday, 9 February 2013

Love and Ribbons


Its been a long week this week with my little one being home from school with some horrible virus and my Dad still hobbling about on crutches so I haven't had much time for crafting!

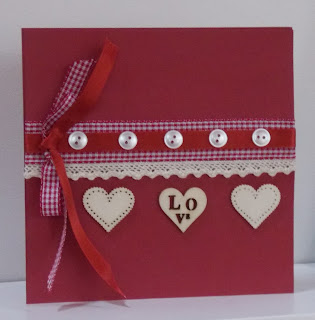
I just had time to make this simple card. After purchasing the recent issue of Crafts Beautiful Magazine I was inspired to make this card by one of the articles in it. I used a 6 x 6 inch card blank and layered lace, ribbon and buttons. I finished the card with three wooden hearts. 

I am entering this card into the following challenges :
Card Crafters Circle - Love is In The Air
Crafty Catz - Love is in the Air
Daring Cardmakers - Love is in the Air
Simply Create Too - Valentines


Sunday, 3 February 2013

Wired Heart Card

Its that time of year for hearts and flowers! This card I have made for a couple of years and is proving to be one of my best sellers in my online craft stores. So I thought I'd finally get round to sharing it with you!


I cut the heart with my Sizzix machine and then wrapped it with wire threaded with beads. The background is cut with decorative scissors and inked with Distress Ink. Finally I used alphabet rubons for the greeting.

I am entering this into the following challenges:

Craft Calendar Challenge - Love and Marriage.
Happy Daze - Love is All Around
Totally Papercrafts - Make Your Own Embellishments
LadyBug Crafts - Love


What can you find here?

The makings and musings of a Sparkly Fairy!